Meme Generator with jQuery and Canvas
In this tutorial, I will show you how to create a meme generator with the HTML element canvas. You can see the result here in my demo script:
Anyone who doesn’t know what a meme is will find a brief explanation below:
Memes are pseudo images featuring a more or less meaningful text phrase. In terms of topics, there are virtually no limitations, and memes are generally created by chance or based on the author’s own creativity. Memes have become an Internet hype, which can likely be traced back to the fact that they are easy to create.
CANVAS – TEACHING A BROWSER TO DRAW
Canvas is an HTML element with freely definable height and width – like a real physical canvas – which can be “drawn on” with the help of Javascript.
And the functions aren’t restricted to lines and rectangles – circles, gradients, and texts can also be processed. But that’s not all: even Bézier curves and external graphics can be used (to a certain extent). They can be rescaled or repositioned, or even cropped.
Canvas treats each inserted object/object group as a separate element that can be moved, scaled, or rotated individually.
With our meme generator, we will be able to select any image or picture and then place two text areas on it using a few slider elements.
Since we will only work with Javascript, we do not need a server-side script or script language (such as PHP) for these basic functions.
Step 1: Creating HTML markup for the configurator
In principle, our meme generator will consist of three parts: an HTML page with configuration options, a minimalistic CSS file (since we will work with the CSS framework Bootstrap), and a Javascript file with our logic.
So, let’s begin with the first part, the HTML configuration page.
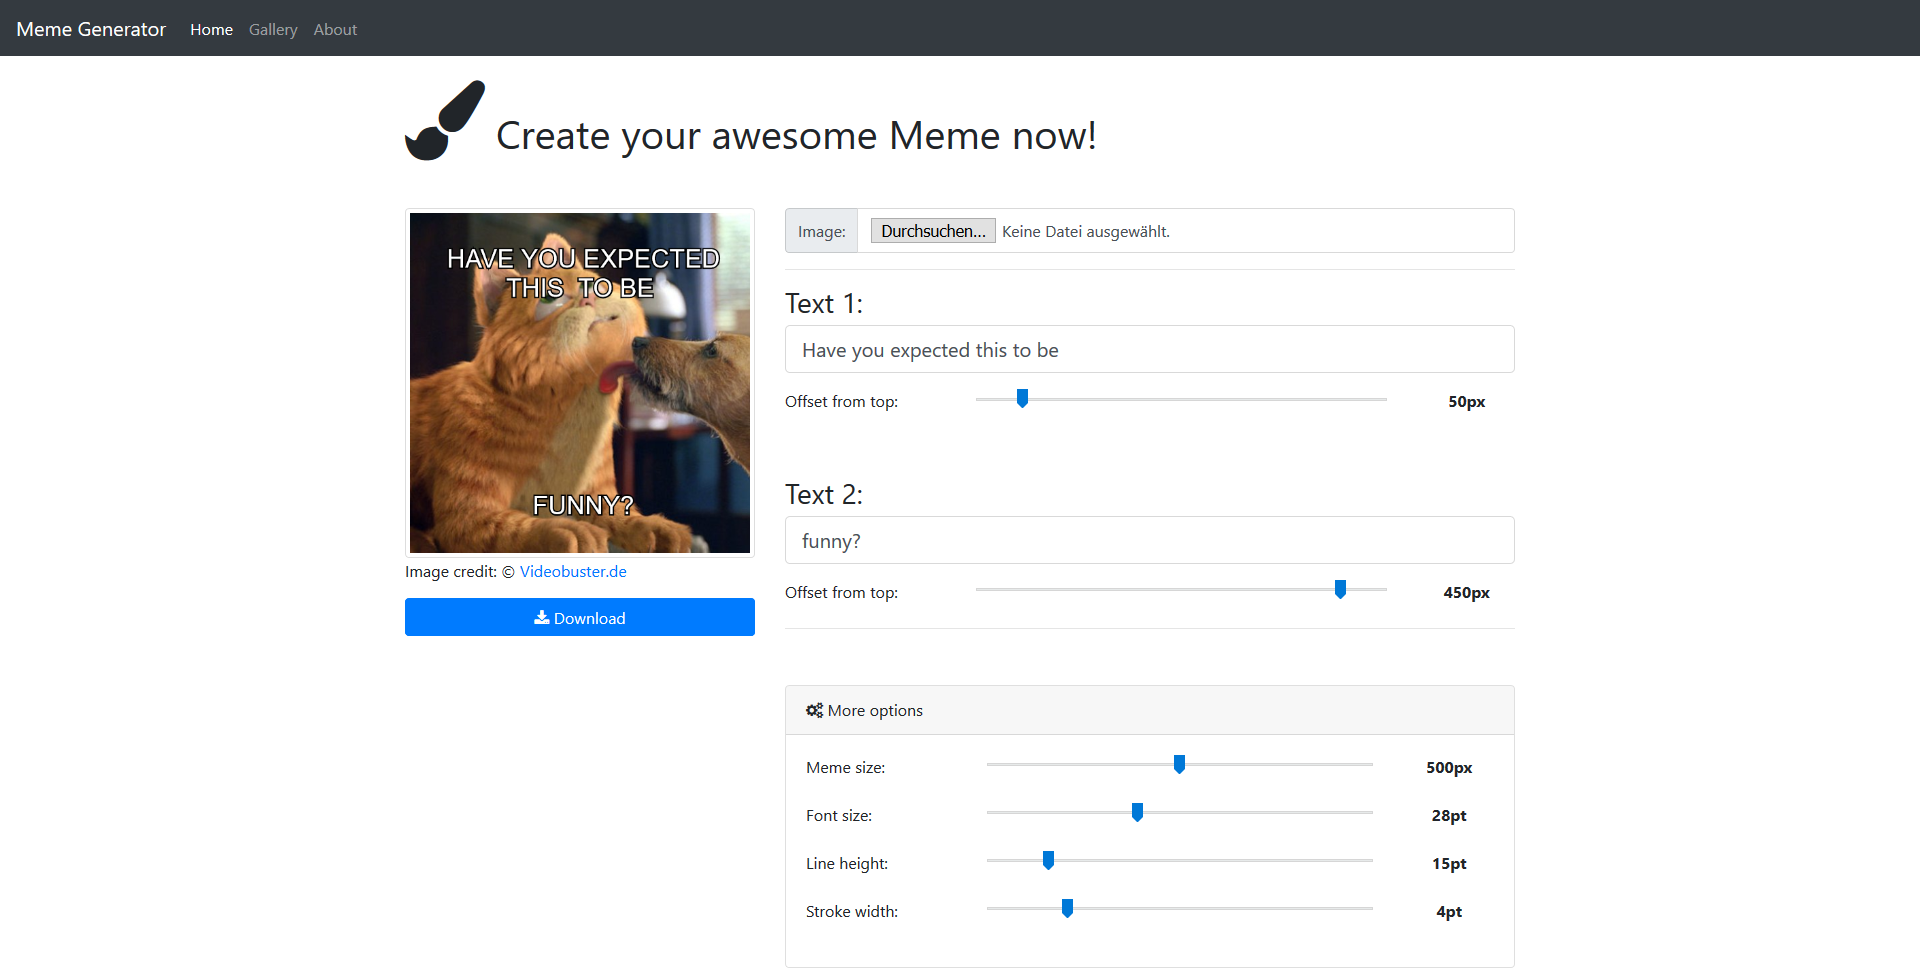
Basically, we are creating a Bootstrap grid layout here (as you can see in the example screenshot above), which will display the meme generated with canvas on the left and the configuration options on the right (with the help of slider elements).
<html> <head> <title>Meme Generator</title> <link rel="stylesheet" href="https://maxcdn.bootstrapcdn.com/bootstrap/4.0.0-beta/css/bootstrap.min.css" integrity="sha384-/Y6pD6FV/Vv2HJnA6t+vslU6fwYXjCFtcEpHbNJ0lyAFsXTsjBbfaDjzALeQsN6M" crossorigin="anonymous"> <link rel="stylesheet" href="https://maxcdn.bootstrapcdn.com/font-awesome/4.7.0/css/font-awesome.min.css" /> <link rel="stylesheet" href="style.css"/> </head> <body> <nav class="navbar navbar-expand-md navbar-dark bg-dark fixed-top"> <a class="navbar-brand" href="#">Meme Generator</a> <button class="navbar-toggler" type="button" data-toggle="collapse" data-target="#navbarsExampleDefault" aria-controls="navbarsExampleDefault" aria-expanded="false" aria-label="Toggle navigation"> <span class="navbar-toggler-icon"></span> </button> <div class="collapse navbar-collapse" id="navbarsExampleDefault"> <ul class="navbar-nav mr-auto"> <li class="nav-item active"> <a class="nav-link" href="#">Home <span class="sr-only">(current)</span></a> </li> <li class="nav-item"> <a class="nav-link" href="#">Gallery</a> </li> <li class="nav-item"> <a class="nav-link" href="#">About</a> </li> </ul> </div> </nav> <div class="container"> <div class="page-header"> <h1><i class="fa fa-2x fa-paint-brush" aria-hidden="true"></i> Create your awesome Meme now!</h1> </div> <p> </p> <div class="row"> <div class="col-md-4"> <!-- BEGIN: Canvas rendering of generated Meme --> <canvas id="meme" class="img-thumbnail img-fluid"> Unfortunately your browser does not support canvas. </canvas> <!-- END: Canvas rendering of generated Meme --> <a href="javascript:;" class="btn btn-primary btn-block" id="download_meme"> <i class="fa fa-download" aria-hidden="true"></i> Download </a> <img id="start-image" src="image.jpg" alt="" /> </div> <div class="col-md-8"> <div class="row"> <div class="col-md-12"> <div class="input-group"> <span class="input-group-addon">Image:</span> <input type="file" class="form-control" id="imgInp" /> </div> </div> </div> <hr /> <h3>Text 1:</h3> <div class="form-group"> <input type="text" class="form-control form-control-lg" value="Have you expected this to be" id="text_top" /> </div> <div class="form-group"> <div class="row"> <label class="control-label col-md-3" for="text_top_offset">Offset from top:</label> <div class="col-md-7"> <input style="width:100%" id="text_top_offset" type="range" min="0" max="500" value="50"/> </div> <div class="col-md-2 setting-value"> <span id="text_top_offset__val">50</span>px </div> </div> </div> <p> </p> <h3>Text 2:</h3> <div class="form-group"> <input type="text" class="form-control form-control-lg" value="funny?" id="text_bottom" /> </div> <div class="form-group"> <div class="row"> <label class="control-label col-md-3" for="text_bottom_offset">Offset from top:</label> <div class="col-md-7"> <input style="width:100%" id="text_bottom_offset" type="range" min="0" max="500" value="450"/> </div> <div class="col-md-2 setting-value"> <span id="text_bottom_offset__val">450</span>px </div> </div> </div> <hr /> <p> </p> <div class="card"> <div class="card-header"> <i class="fa fa-cogs" aria-hidden="true"></i> More options </div> <div class="card-body"> <div class="row"> <div class="col-md-12"> <div class="form-group"> <div class="row"> <label class="control-label col-md-3" for="canvas_size">Meme size:</label> <div class="col-md-7"> <input style="width:100%" id="canvas_size" type="range" min="0" max="1000" value="500"/> </div> <div class="col-md-2 setting-value"> <span id="canvas_size__val">500</span>px </div> </div> </div> <div class="form-group"> <div class="row"> <label class="control-label col-md-3" for="text_font_size">Font size:</label> <div class="col-md-7"> <input style="width:100%" id="text_font_size" type="range" min="0" max="72" value="28"/> </div> <div class="col-md-2 setting-value"> <span id="text_font_size__val">28</span>pt </div> </div> </div> <div class="form-group"> <div class="row"> <label class="control-label col-md-3" for="text_line_height">Line height:</label> <div class="col-md-7"> <input style="width:100%" id="text_line_height" type="range" min="0" max="100" value="15"/> </div> <div class="col-md-2 setting-value"> <span id="text_line_height__val">15</span>pt </div> </div> </div> <div class="form-group"> <div class="row"> <label class="control-label col-md-3" for="text_stroke_width">Stroke width:</label> <div class="col-md-7"> <input style="width:100%" id="text_stroke_width" type="range" min="0" max="20" value="4"/> </div> <div class="col-md-2 setting-value"> <span id="text_stroke_width__val">4</span>pt </div> </div> </div> </div> </div> </div> </div> </div> </div> </div> <!-- Bootstrap core JavaScript ================================================== --> <!-- Placed at the end of the document so the pages load faster --> <script src="https://code.jquery.com/jquery-3.2.1.slim.min.js" integrity="sha384-KJ3o2DKtIkvYIK3UENzmM7KCkRr/rE9/Qpg6aAZGJwFDMVNA/GpGFF93hXpG5KkN" crossorigin="anonymous"></script> <script src="https://cdnjs.cloudflare.com/ajax/libs/popper.js/1.11.0/umd/popper.min.js" integrity="sha384-b/U6ypiBEHpOf/4+1nzFpr53nxSS+GLCkfwBdFNTxtclqqenISfwAzpKaMNFNmj4" crossorigin="anonymous"></script> <script src="https://maxcdn.bootstrapcdn.com/bootstrap/4.0.0-beta/js/bootstrap.min.js" integrity="sha384-h0AbiXch4ZDo7tp9hKZ4TsHbi047NrKGLO3SEJAg45jXxnGIfYzk4Si90RDIqNm1" crossorigin="anonymous"></script> <script src="app.js"></script> </body> </html>
As you can see here, all you have to do is define a “canvas” HTML tag for canvas. Optionally, you can also enter inline dimensions directly, instead of via CSS definitions. The text within the canvas tag is only shown in browsers that do not support this technology.
The slider elements are assigned their own ID we will later use via Javascript or jQuery. This not only gives us their set value, but also allows us to set their start and end range dynamically based on the image file’s metadata (its dimensions).
Step 2: Preparing the CSS file
As mentioned before, the CSS file style.css will be very minimalistic since we will use standard Bootstrap elements in this tutorial.
body {
  padding-top: 5rem;
}

img#start-image {
	position: absolute;
	left: -10000px;
	top: -10000px;
}

.setting-value {
	text-align: center;
	font-weight: bold;
}
We already embedded the Boostrap framework via its CDN (including the corresponding Javascript resources).
The image with the ID “start-image” is simply the holder for our source image file for canvas rendering. For this reason, we will move it off screen for convenience.
Step 3: Embedding Javascript logic
To be able to embed the Javascript logic, we will first create the file named app.js (already linked in HTML) with the following jQuery framework.
$(document).ready(function(){

	// here will be the whole application logic...

});
All further steps will take place within this block.
First, we will begin by initializing the canvas element with the ID “meme”:
var canvas = document.getElementById('meme');
ctx = canvas.getContext('2d');
In the ctx variable, within the jQuery scope we now have the application context for our canvas element, which is available via the canvas variable.
Let’s begin bringing our application to life by creating the main function for generating memes. First, we will create an empty function named drawMeme().
// core drawing function
var drawMeme = function() {
	// here will be our "drawing-code" for our memes...

};
The actual functional logic for this will follow a bit later.
We have already created the two text fields for the upper and lower text areas in our HTML markup as well as the slider input fields for the configuration options, so we will now register our drawMeme() function for all relevant events of these fields.
Primarily, these are change, keyup, and keydown for the fields with text input, as well as the change event for our slider input fields.
// register event listeners

$(document).on('change keydown keyup', '#text_top', function() {
	drawMeme();
});

$(document).on('change keydown keyup', '#text_bottom', function() {
	drawMeme();
});

$(document).on('input change', '#text_top_offset', function() {
	$('#text_top_offset__val').text( $(this).val() );
	drawMeme();
});

$(document).on('input change', '#text_bottom_offset', function() {
	$('#text_bottom_offset__val').text( $(this).val() );
	drawMeme();
});

$(document).on('input change', '#text_font_size', function() {
	$('#text_font_size__val').text( $(this).val() );
	drawMeme();
});

$(document).on('input change', '#text_line_height', function() {
	$('#text_line_height__val').text( $(this).val() );
	drawMeme();
});

$(document).on('input change', '#text_stroke_width', function() {
	$('#text_stroke_width__val').text( $(this).val() );
	drawMeme();
});

$(document).on('input change', '#canvas_size', function() {
	$('#canvas_size__val').text( $(this).val() );
	drawMeme();
});
The additional input event for these fields ensures that these handlers are also triggered when the slider input field is in use (dragging back and forth using the mouse).
In addition, we will show the value set for these fields in the configuration form by transferring it to the corresponding element with the help of the text function and overwriting its content with new content.
Now, we will begin to gradually structure our drawMeme() function.
// core drawing function
var drawMeme = function() {
	var img = document.getElementById('start-image');

	var fontSize = parseInt( $('#text_font_size').val() );
	var memeSize = parseInt( $('#canvas_size').val() );

	// set form field properties
	$('#text_top_offset').attr('max', memeSize);
	$('#text_bottom_offset').attr('max', memeSize);


};
We will use the source image file we assigned the ID “start-image” in the img variable. The corresponding Javascript object is now available in this variable.
The reason why we are working with the blank Javascript object instead of the jQuery equivalent is that we need this Javascript object in this intact form for the canvas functions.
In addition, we take the desired size for our meme from the input field, and in the next step we will set the maximum values for our offset configuration options (for adjusting the vertical placement of the texts) to limit the slider elements accordingly.
Next, we will configure the canvas element by defining its dimensions. First, we will use the canvas function drawImage() to transfer the source image file that we saved in the img variable to this element.
// initialize canvas element with desired dimensions
canvas.width = memeSize;
canvas.height = memeSize;

ctx.clearRect(0, 0, canvas.width, canvas.height);

// calculate minimum cropping dimension
var croppingDimension = img.height;
if( img.width < croppingDimension ){
	croppingDimension = img.width;
}

ctx.drawImage(img, 0, 0, croppingDimension, croppingDimension, 0, 0, memeSize, memeSize);
To prevent the source image from being skewed, we will use the cropping function available in canvas. We take the maximum value for this right out of our source file by comparing the height and width and determining a suitable size.
Memes are generally square (size defined in the memeSize variable), so the image file should also have a square ratio (size defined in the croppingDimension variable).
In this case, the source image file will be scaled down to the meme dimensions and cropped to a square image. To keep it simple, we will skip any other adjustments for this cropping process.
To be able to position the texts in our meme canvas, we will write a short helper function wrapText() (outside the drawMeme() function):
// build inner container for wrapping text inside
var wrapText = function(context, text, x, y, maxWidth, lineHeight, fromBottom) {
	var pushMethod = (fromBottom) ? 'unshift' : 'push';

	lineHeight = (fromBottom) ? -lineHeight : lineHeight;

	var lines = [];
	var y = y;
	var line = '';
	var words = text.split(' ');

	for (var n = 0; n < words.length; n++) {
		var testLine = line + ' ' + words[n];
		var metrics = context.measureText(testLine);
		var testWidth = metrics.width;

		if (testWidth > maxWidth) {
			lines[pushMethod](line);
			line = words[n] + ' ';
		} else {
			line = testLine;
		}
	}
	lines[pushMethod](line);

	for (var k in lines) {
		context.strokeText(lines[k], x, y + lineHeight * k);
		context.fillText(lines[k], x, y + lineHeight * k);
	}
};
Basically, we will now transfer the canvas scope via the context parameter, a few parameters that affect the text to be inserted, as well as its position properties.
Here, we want to use the font size and spacing to calculate concrete X and Y coordinates and transfer them to the canvas scope (context variable). You can simply take this over for now.
Back in the drawMeme() function, we will now create the basic settings for the canvas text using our configuration fields from the HTML mask.
Next, we will change the text input to capital letters and enter the desired Y position. The X coordinate is exactly half of the meme width, since the text should be positioned centered.
ctx.lineWidth  = parseInt( $('#text_stroke_width').val() );
ctx.font = fontSize + 'pt sans-serif';
ctx.strokeStyle = 'black';
ctx.fillStyle = 'white';
ctx.textAlign = 'center';
ctx.textBaseline = 'top';

var text1 = $('#text_top').val();
text1 = text1.toUpperCase();
x = memeSize / 2;
y = parseInt( $('#text_top_offset').val() );

var lineHeight = fontSize + parseInt( $('#text_line_height').val() );
var maxTextAreaWidth = memeSize * 0.85;

wrapText(ctx, text1, x, y, maxTextAreaWidth, lineHeight, false);
With the maxTextAreaWidth variable, we will limit the maximum text width to 85%. This is primarily for visual reasons.
We will then repeat this for the bottom text, only that we will no longer redefine the basic font settings, but instead simply overwrite them for the corresponding properties.
ctx.textBaseline = 'bottom';
var text2 = $('#text_bottom').val();
text2 = text2.toUpperCase();
y = parseInt( $('#text_bottom_offset').val() );

wrapText(ctx, text2, x, y, maxTextAreaWidth, lineHeight, true);
So that you can choose your own pictures, we will now give our file input field the corresponding function:
// read selected input image from upload field and display it in browser
$("#imgInp").change(function(){
	var input = this;

	if (input.files && input.files[0]) {
		var reader = new FileReader();

		reader.onload = function (e) {
			$('#start-image').attr('src', e.target.result);
		}

		reader.readAsDataURL(input.files[0]);
	}

	window.setTimeout(function(){
		drawMeme();
	}, 500);
});
When a new image is selected, the Javascript file reader reads the image in and sets its Base64 string as the source (“src” attribute) of our source image file (with the ID “start-image”).
Next, we will once again trigger the drawMeme() function so that it will read in and process the new image.
Now, something should be happening on the meme generator page if you change one of the slider elements or input fields, since at least one change event is triggered, calling the drawMeme() function.
We will call the drawMeme() function when loading the page so that we will see some changes right when opening the page:
// init at startup
window.setTimeout(function(){
	drawMeme();
}, 100);
You can download this functioning example here:
Step 4: Adding an optional download link
You can read out the current image as a Base64 string from your canvas element with the help of the toDataURL() function at any time.
One option would be to set this Base64 string as an “href” attribute for your download link and to specify the desired file name using the “download” attribute.
$('#download_meme').click(function(e){
	$(this).attr('href', canvas.toDataURL());
	$(this).attr('download', 'meme.png');
});
However, note that this is not supported by all browsers and therefore will not work everywhere.
Ideally, you should send this Base64 string via jQuery.post() or jQuery.ajax to a server-side script that then returns the string with the corresponding “Content-Type” header (“image/png”).
This would ensure that the function works in all browsers.
Conclusion
Canvas is a powerful tool for drawing dynamic graphics in your browser using Javascript.
You will most frequently find canvas in conjunction with charting libraries, since this technology is well-established in the area of statistics.
Working with canvas is quite easy. The only thing that can get complicated is – as in our meme generator example – correctly determining/calculating the individual positions of the generated elements.