Setting up your own online chat module with CodeIgniter
Everyone is familiar with it, or has at least seen it before – we’re talking about the online chat feature available on many websites like Facebook or Google+.
But what the underlying technology actually looks like and how these chat services basically work is what I would like to explain in the following.
You can then complete a tutorial on how to build your own chat feature using the CodeIgniter framework for your next web development.
THE UNDERLYING PRINCIPLE
There are essentially three different types of online chat:
- Internet Relay Chat (IRC)
- Web chat
- Instant Messaging
IRC uses a traditional client-server architecture, which requires special chat servers that are interconnected. A dedicated piece of client software that is either installed directly on the PCs of the various chat participants or runs in their browser is used to exchange messages.
Simple webchat modules, such as those used on live support systems, do not require any additional software. Communication is usually limited to the specific website.
Instant messaging is completely different, however. Communications are not typically exchanged by way of a public chatroom, but rather exclusively between the respective chat participants who identify themselves using a specific piece of software.
IRC and instant messaging usually offer other features such as chat logs or files transfers as well.
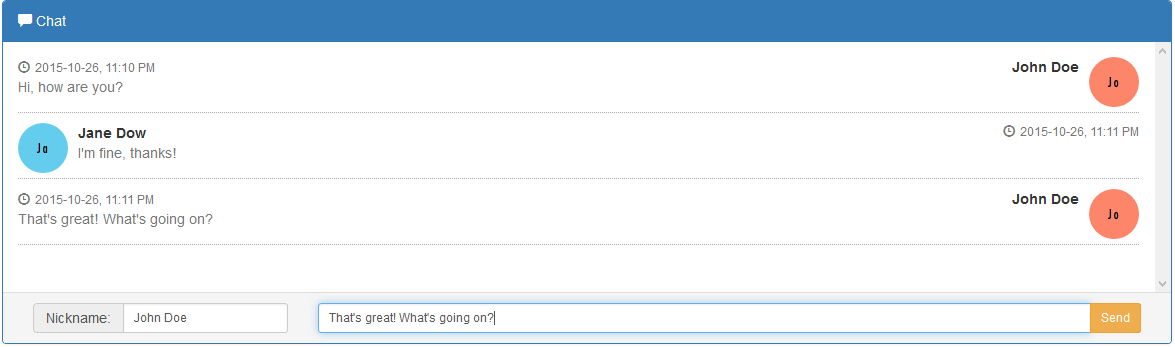
YOUR OWN CHAT MODULE WITH CODEIGNITER
![]()
BUILD THE FOUNDATION
To get started, we recommend that you first download the latest version of the CodeIgniter framework from the website (http://www.codeigniter.com). This is currently version 3.0.2.
Next, copy all of the files to a subdirectory called “ci-chat” on the web server (e.g. XAMPP, LAMP, etc.) and open its root directory in your browser, e.g. http://localhost/ci-chat/.
Once all of the requirements for the framework are met, you should then see the CodeIgniter welcome page.
In the autoloader configuration, navigate to /application/config/autoload.php and then add the URL Helper and the database library, as we will need these components later.
$autoload['libraries'] = array('database');
$autoload['helper'] = array('url');
In the route configuration under /application/config/routes.php, now change the default controller from “welcome” to “chat” since later we want our chat application to be loaded by default.
THE APPLICATION ITSELF
$route['default_controller'] = 'chat';
The actual application
In the current state, the route configuration would simply return a 404 error because we have not yet defined a chat controller.
So we first need to create a new controller under /application/controllers with a new nameChat.php and should also note the following here:
<?php
defined('BASEPATH') OR exit('No direct script access allowed');

class Chat extends CI_Controller {


	public function index()
	{
		$this->load->view('chat');
	}
}
This controller looks ‒ and is ‒ primitive. Its only purpose is to load the appropriate view. A separate API controller is used for the actual functionality.
It would, of course, be possible to include the entire logic in the previously created controller as well. The separation into multiple controllers makes sense, especially in the case of larger projects, because it greatly increases readability and therefore maintainability.
To save the individual messages so that they can then be delivered to the other chat participants, we need a database and a suitable model.
CREATE TABLE IF NOT EXISTS `messages` (
`id` int(11) NOT NULL AUTO_INCREMENT PRIMARY KEY,
`message` text NOT NULL,
`nickname` varchar(50) NOT NULL,
`guid` varchar(100) NOT NULL,
`timestamp` int(11) NOT NULL
);
Under /application/models, we will now create a new model called Chat_model.php and add the following items:
<?php
defined('BASEPATH') OR exit('No direct script access allowed');

class Chat_model extends CI_Model {

	function add_message($message, $nickname, $guid)
	{
		$data = array(
			'message'	=> (string) $message,
			'nickname'	=> (string) $nickname,
			'guid'		=> (string)	$guid,
			'timestamp'	=> time(),
		);

		$this->db->insert('messages', $data);
	}

	function get_messages($timestamp)
	{
		$this->db->where('timestamp >', $timestamp);
		$this->db->order_by('timestamp', 'DESC');
		$this->db->limit(10);
		$query = $this->db->get('messages');

		return array_reverse($query->result_array());
	}

}
The method add_message() allows us to add new messages. The parameter of the method is the actual message and nickname of the chat participant who sent the message. To avoid conflicts when multiple chat participants use the same nickname, we also save a GUID. This is a unique identifier, which will then be used only by the application itself.
The method get_messages() lets us retrieve all messages written from a specific point in time. The method requires the respective UNIX timestamp for this.
To make both of these methods available externally as well, we create a new controller Api.php under /application/controllers and add:
<?php
defined('BASEPATH') OR exit('No direct script access allowed');

class Api extends CI_Controller {


	public function __construct()
	{
		parent::__construct();

		$this->load->model('Chat_model');
	}


	public function send_message()
	{
		$message = $this->input->get('message', null);
		$nickname = $this->input->get('nickname', '');
		$guid = $this->input->get('guid', '');

		$this->Chat_model->add_message($message, $nickname, $guid);

		$this->_setOutput($message);
	}


	public function get_messages()
	{
		$timestamp = $this->input->get('timestamp', null);

		$messages = $this->Chat_model->get_messages($timestamp);

		$this->_setOutput($messages);
	}


	private function _setOutput($data)
	{
		header('Cache-Control: no-cache, must-revalidate');
		header('Expires: Mon, 26 Jul 1997 05:00:00 GMT');
		header('Content-type: application/json');

		echo json_encode($data);
	}
}
The previously created chat model is now loaded into the framework. In addition, _setOutput() is used to set up a central output handler, to which we simply pass the required data and then process this accordingly (in this case, JSON).
The graphical user interface
Under /application/views, we create a new view chat.php (which we already linked in the chat controller).
Here, we build the basic HTML framework for our chat based on jQuery und Bootstrap.
<?php
defined('BASEPATH') OR exit('No direct script access allowed');
?><!DOCTYPE html>
<html lang="en">
<head>
	<meta charset="utf-8">
	<title>Chat-Example | CodeIgniter</title>

	<script  src="https://code.jquery.com/jquery-2.1.4.min.js"></script>


	<link rel="stylesheet" href="https://maxcdn.bootstrapcdn.com/bootstrap/3.3.5/css/bootstrap.min.css" />
	<script  src="https://maxcdn.bootstrapcdn.com/bootstrap/3.3.5/js/bootstrap.min.js"></script>

	<!-- http://bootsnipp.com/snippets/4jXW -->
	<link rel="stylesheet" href="<?php echo base_url(); ?>assets/css/chat.css" />


	<script >
		$( document ).ready ( function () {

			$('#nickname').keyup(function() {
				var nickname = $(this).val();

				if(nickname == ''){
					$('#msg_block').hide();
				}else{
					$('#msg_block').show();
				}
			});

			// initial nickname check
			$('#nickname').trigger('keyup');
		});


	</script>

</head>
<body>


<div class="container">
    <div class="row">
		<div class="panel panel-primary">
			<div class="panel-heading">
				<span class="glyphicon glyphicon-comment"></span> Chat
			</div>
			<div class="panel-body">
				<ul class="chat" id="received">

				</ul>
			</div>
			<div class="panel-footer">
				<div class="clearfix">
					<div class="col-md-3">
						<div class="input-group">
							<span class="input-group-addon">
								Nickname:
							</span>
							<input id="nickname" type="text" class="form-control input-sm" placeholder="Nickname..." />
						</div>
					</div>
					<div class="col-md-9" id="msg_block">
						<div class="input-group">
							<input id="message" type="text" class="form-control input-sm" placeholder="Type your message here..." />
							<span class="input-group-btn">
								<button class="btn btn-warning btn-sm" id="submit">Send</button>
							</span>
						</div>
					</div>
				</div>
			</div>
		</div>
    </div>
</div>


</body>
</html>
In the Javascript section there is a check, so that the input field for chat messages is only visible if the user has entered a nickname.
For making this looking beautiful, we now create a chat.css with following content:
.chat
{
    list-style: none;
    margin: 0;
    padding: 0;
}

.chat li
{
    margin-bottom: 10px;
    padding-bottom: 5px;
    border-bottom: 1px dotted #B3A9A9;
}

.chat li.left .chat-body
{
    margin-left: 60px;
}

.chat li.right .chat-body
{
    margin-right: 60px;
}


.chat li .chat-body p
{
    margin: 0;
    color: #777777;
}

.panel .slidedown .glyphicon, .chat .glyphicon
{
    margin-right: 5px;
}

.panel-body
{
    overflow-y: scroll;
    height: 250px;
}

::-webkit-scrollbar-track
{
    -webkit-box-shadow: inset 0 0 6px rgba(0,0,0,0.3);
    background-color: #F5F5F5;
}

::-webkit-scrollbar
{
    width: 12px;
    background-color: #F5F5F5;
}

::-webkit-scrollbar-thumb
{
    -webkit-box-shadow: inset 0 0 6px rgba(0,0,0,.3);
    background-color: #555;
}
In the next step we define here additional auxiliary functions and also save the GUID of the chat participant in a cookie. For simplicity, this identifier is generated locally in the browser. In a production environment, this could for example be stored in a user table directly in the database.
var request_timestamp = 0;

var setCookie = function(key, value) {
	var expires = new Date();
	expires.setTime(expires.getTime() + (5 * 60 * 1000));
	document.cookie = key + '=' + value + ';expires=' + expires.toUTCString();
}

var getCookie = function(key) {
	var keyValue = document.cookie.match('(^|;) ?' + key + '=([^;]*)(;|$)');
	return keyValue ? keyValue[2] : null;
}

var guid = function() {
	function s4() {
		return Math.floor((1 + Math.random()) * 0x10000).toString(16).substring(1);
	}
	return s4() + s4() + '-' + s4() + '-' + s4() + '-' + s4() + '-' + s4() + s4() + s4();
}

if(getCookie('user_guid') == null || typeof(getCookie('user_guid')) == 'undefined'){
	var user_guid = guid();
	setCookie('user_guid', user_guid);
}


// https://gist.github.com/kmaida/6045266
var parseTimestamp = function(timestamp) {
	var d = new Date( timestamp * 1000 ), // milliseconds
		yyyy = d.getFullYear(),
		mm = ('0' + (d.getMonth() + 1)).slice(-2),	// Months are zero based. Add leading 0.
		dd = ('0' + d.getDate()).slice(-2),			// Add leading 0.
		hh = d.getHours(),
		h = hh,
		min = ('0' + d.getMinutes()).slice(-2),		// Add leading 0.
		ampm = 'AM',
		timeString;

	if (hh > 12) {
		h = hh - 12;
		ampm = 'PM';
	} else if (hh === 12) {
		h = 12;
		ampm = 'PM';
	} else if (hh == 0) {
		h = 12;
	}

	timeString = yyyy + '-' + mm + '-' + dd + ', ' + h + ':' + min + ' ' + ampm;

	return timeString;
}
Now we define the actual functions in the form of closures for adding and displaying messages.
var sendChat = function (message, callback) {
	$.getJSON('<?php echo base_url(); ?>api/send_message?message=' + message + '&nickname=' + $('#nickname').val() + '&guid=' + getCookie('user_guid'), function (data){
		callback();
	});
}

var append_chat_data = function (chat_data) {
	chat_data.forEach(function (data) {
		var is_me = data.guid == getCookie('user_guid');

		if(is_me){
			var html = '<li class="right clearfix">';
			html += '	<span class="chat-img pull-right">';
			html += '		<img src="http://placehold.it/50/FA6F57/fff&text=' + data.nickname.slice(0,2) + '" alt="User Avatar" class="img-circle" />';
			html += '	</span>';
			html += '	<div class="chat-body clearfix">';
			html += '		<div class="header">';
			html += '			<small class="text-muted"><span class="glyphicon glyphicon-time"></span>' + parseTimestamp(data.timestamp) + '</small>';
			html += '			<strong class="pull-right primary-font">' + data.nickname + '</strong>';
			html += '		</div>';
			html += '		<p>' + data.message + '</p>';
			html += '	</div>';
			html += '</li>';
		}else{

			var html = '<li class="left clearfix">';
			html += '	<span class="chat-img pull-left">';
			html += '		<img src="http://placehold.it/50/55C1E7/fff&text=' + data.nickname.slice(0,2) + '" alt="User Avatar" class="img-circle" />';
			html += '	</span>';
			html += '	<div class="chat-body clearfix">';
			html += '		<div class="header">';
			html += '			<strong class="primary-font">' + data.nickname + '</strong>';
			html += '			<small class="pull-right text-muted"><span class="glyphicon glyphicon-time"></span>' + parseTimestamp(data.timestamp) + '</small>';

			html += '		</div>';
			html += '		<p>' + data.message + '</p>';
			html += '	</div>';
			html += '</li>';
		}
		$("#received").html( $("#received").html() + html);
	});

	$('#received').animate({ scrollTop: $('#received').height()}, 1000);
}

var update_chats = function () {
	if(typeof(request_timestamp) == 'undefined' || request_timestamp == 0){
		var offset = 60*15; // 15min
		request_timestamp = parseInt( Date.now() / 1000 - offset );
	}
	$.getJSON('<?php echo base_url(); ?>api/get_messages?timestamp=' + request_timestamp, function (data){
		append_chat_data(data);

		var newIndex = data.length-1;
		if(typeof(data[newIndex]) != 'undefined'){
			request_timestamp = data[newIndex].timestamp;
		}
	});
}
For the sake of simplicity, the HTML markup is assembled directly in append_chat_data(). The data itself is ideally passed to separate rendering functions, or a proper JavaScript template engine is used.
However, this would go well beyond the scope of this example, which is why we are using this basic solution
Now we define the behavior of actual GUI.
$('#submit').click(function (e) {
	e.preventDefault();

	var $field = $('#message');
	var data = $field.val();

	$field.addClass('disabled').attr('disabled', 'disabled');
	sendChat(data, function (){
		$field.val('').removeClass('disabled').removeAttr('disabled');
	});
});

$('#message').keyup(function (e) {
	if (e.which == 13) {
		$('#submit').trigger('click');
	}
});

setInterval(function (){
	update_chats();
}, 1500);
This code makes it possible to send messages directly by clicking on the Enter button and disables the field until the message has been processed by the server. In the callback from sendChat(), this field is enabled again.
To ensure all messages are received nearly in real-time, the function update_chats() is called in 1.5 second intervals. The function uses the respective timestamp to check whether there are new messages and adds them to the chat window if any are available.
Conclusion
The type of chat integration presented in this example generates numerous server requests and therefore a relatively high server load for the database.
For larger websites, it would be advisable to opt for an appropriate infrastructure, i.e. select a suitable chat protocol (e.g. XMPP) and then select an appropriate integration option.
This example is intended for learning purposes, but can still be implemented for smaller-scale websites that see less traffic.
Note: This example requires basic knowledge of the CodeIgniter framework (see Quickstart to the CodeIgniter framework) and uses uses certain open source code snippets from Bootswatch.com.